
Getting started in graphic design can feel a little intimidating, but the right software makes all the difference. Think of it as your own digital art studio, packed with every tool you could ever need—from digital pencils and paintbrushes to endless canvases. This guide will walk you through the essentials and show you just how achievable professional-looking design really is.
Your First Step into Digital Design
Jumping into graphic design software is the first real step toward bringing your ideas to life. These programs are the bridge between what's in your head and a finished design, whether that’s a sharp new logo, a slick social media post, or a classic business card. The best part? You don't need to be a seasoned pro to get started.
Modern design tools are built to be user-friendly, with intuitive templates and simple drag-and-drop interfaces that let anyone create something great. This accessibility is a huge reason why we see so much amazing digital content today. The market for these tools is massive—valued at around USD 8.41 billion in 2023 and expected to hit nearly USD 13.98 billion by 2030. That growth is a clear sign of just how many people are using this software to create. You can dive deeper into these numbers in this detailed market report.
Understanding the Main Software Types
To pick the right tool, you first need to know the main categories. Just like a painter uses different brushes for different effects, each type of software is built for a specific job. Getting this right from the start will save you a lot of headaches. And while you're learning the tools, it's also a great idea to pick up the lingo. Our guide on essential graphic design terminology is a great place to start.
It all comes down to matching the software's strengths with your project goals. Here’s a quick rundown of the big three:
- Raster Editors: Think photos. These tools are masters of pixels and are perfect for photo editing, digital painting, and creating detailed graphics for the web.
- Vector Editors: Think logos and icons. Vector graphics use math, not pixels, which means you can scale them to any size—from a tiny app icon to a massive billboard—without losing any quality.
- Layout and Publishing Tools: These are for bringing it all together. They let you combine text, images, and graphics into polished layouts for things like magazines, brochures, and ebooks.
To help you get a clearer picture, here's a quick look at the different software types and what they're best for.
Quick Guide to Beginner Design Software Types
This table should give you a solid starting point for figuring out which tool fits your needs.
Your Path to Creating
Don't overthink your first choice. If you just want to make awesome social media posts, a user-friendly, template-based tool is a perfect place to start. If you're itching to draw custom logos and illustrations from scratch, a vector editor will be your best friend.
The most effective way to learn is by doing. Don't worry about mastering every feature at once. Instead, pick one simple project—like designing a birthday invitation or a personal profile banner—and learn the tools you need to complete it.
The journey begins with a single step and a single project. Just pick a tool and start creating
Vector vs. Raster: The Building Blocks of Digital Images
Before you touch any software, there's one core concept you absolutely have to grasp: the difference between raster and vector graphics. Getting this right is like a chef knowing the difference between baking and frying. They're both ways to cook, but you can't swap them and expect the same results. Every digital image you’ve ever seen falls into one of these two buckets.
Think of a raster graphic as a digital painting made on a massive grid. Each tiny square on that grid, called a pixel, is filled with a single color. When you stand back, millions of these colored squares blend together to form a complete picture, like a photograph. This is why raster images are perfect for capturing the rich detail, subtle shadows, and complex color gradients of real-world photos.
But here’s the catch. That grid has a fixed size. If you try to make the image bigger, the computer has to guess how to fill in the extra space by stretching the existing pixels. The result? A blurry, jagged mess. It’s often called "pixelation," and it's the enemy of crisp, professional design.

The Magic of Math
Now, let's talk about vectors. Instead of using a grid of pixels, vector graphics are built from math. They're essentially a set of instructions that tell the computer, "draw a line from point A to point B" or "create a circle with this radius and fill it with this color." It's a blueprint, not a painting.
And that's where their superpower lies. When you need to resize a vector graphic, you aren't stretching pixels. You're just changing the numbers in the mathematical blueprint. The computer recalculates and redraws the image perfectly, every single time. A vector logo will look just as sharp on a tiny business card as it will blown up on a giant billboard. No blurriness, ever.
Key Takeaway: Raster images are made of pixels and lose quality when scaled up. Vector images are made of mathematical paths and can be scaled to any size without losing quality.
This incredible flexibility is exactly why logos, icons, and many illustrations are almost always created as vectors. A brand’s logo needs to look perfect everywhere, and using a vector format guarantees that consistency.
Picking the Right Tool for the Job
So, which one should you use? It all comes down to what you're trying to create. Your project's needs will point you to the right type of graphic design software.
Go for a raster program (like Adobe Photoshop or GIMP) when you're working on:
- Photo Editing: This is their bread and butter. Retouching, color-correcting, and combining photos.
- Digital Painting: Creating artwork with painterly textures, soft blends, and detailed brushwork.
- Web Graphics: Making things like social media posts or website banners where you know the exact final dimensions.
On the other hand, grab a vector program (like Adobe Illustrator or Inkscape) for:
- Logo Design: Creating logos that need to scale flawlessly for any use.
- Icons: Designing simple, clean icons for websites and apps.
- Illustrations: For graphics with clean lines, sharp edges, and solid colors.
- Typography: Laying out text or even designing your own custom fonts.
Understanding this difference is probably the most important first step you'll take. It guides your software choice and sets your projects up for success from the very beginning. To see how this plays out with branding assets, you can learn more about choosing the right logo file format in our detailed guide. Making the right call early on will save you a world of headaches later.
The Only Features You Really Need to Get Started
Opening graphic design software for the first time can be overwhelming. It feels like staring at a spaceship's control panel—a dizzying array of buttons, menus, and tools. But here’s the secret: you don't need to know what every single button does. You just need to master a handful of core features to start creating.
Think of it like learning to cook. You don't need a professional kitchen with every gadget imaginable. You just need a good knife, a cutting board, and a pan. We'll focus on those essentials—the features you'll use every single day.
It's a great time to be learning, too. The graphic design market is a USD 45.8 billion industry, and with freelancers making up around 90% of designers, software companies are racing to build tools that are powerful yet easy to learn. You can dive deeper into these industry trends and statistics if you're curious.
Layers: Your New Best Friend
If you take away just one concept from this guide, let it be layers. Seriously, this is the big one.
Imagine drawing on a stack of clear plastic sheets. You could draw a sun on the top sheet, some clouds on the one underneath it, and a blue sky on the very bottom sheet. You can move the sun around without smudging the clouds, or erase the clouds without touching the sky.
That’s exactly how layers work. Every piece of your design—a photo, a block of text, a simple shape—sits on its own separate, transparent layer. This is huge for beginners because it means you can edit one thing without accidentally messing up everything else. Want to move the sun? Just grab its layer and drag it. It’s a completely forgiving way to work, giving you the freedom to experiment without fear.
The Basic Toolkit for Creating and Editing
Once you get the hang of layers, you'll spend most of your time with a small set of creation and editing tools. These are your digital pens, brushes, and scissors. Any decent software for beginners will have these non-negotiables.
Here are the essentials you’ll be reaching for:
- Shape Tools: Your go-to for creating perfect rectangles, circles, and other geometric shapes with a single click. These are the fundamental building blocks for icons, logos, buttons, and layouts.
- Pen or Path Tool: This tool looks a little scary at first, but it’s the most powerful drawing tool you have. It lets you draw custom shapes and smooth curves by placing down a series of dots (or "anchor points"). It’s the key to creating unique logos and illustrations from scratch.
- Selection Tools: Just like they sound, these let you "select" parts of your design to edit. You might use a simple box to select a big area or a "magic wand" to instantly select all of one color.
Get comfortable with how shapes and paths work together. Once you master these basic creation tools, you'll be surprised how quickly you can build almost any design you can think of, moving well beyond simple templates.
Making It Pop with Text and Color
A design isn't finished until you’ve nailed the typography and color. The right tools here make all the difference between something that looks amateur and something that looks professional.
Typography Tools are for all things text. At a bare minimum, the software should let you:
- Pick from a library of different fonts.
- Easily change the size, weight (like bold or light), and alignment.
- Fine-tune the spacing between letters (kerning) and lines of text (leading).
Color Tools are what breathe life into your work. Look for a simple color picker that lets you choose colors visually. A great bonus is an eyedropper tool, which lets you click on any image to "suck up" its color—perfect for matching your text to a photo. The ability to create and save color palettes is also a must-have for keeping your projects looking consistent.
Comparing The Best Beginner Design Tools
Now that you understand the essential features, it's time to pick your toolkit. The good news is that the world of graphic design software is incredibly welcoming to newcomers, with options ranging from simple, browser-based tools to the entry rungs of professional-grade programs.
Instead of getting bogged down in endless feature lists, the best way to choose is to think about what you actually want to do. Are you trying to whip up eye-catching social media posts in minutes? Or are you dreaming of learning the true craft of logo design? The right tool is simply the one that aligns with your goals.
Best For Quick and Easy Social Media Graphics
For anyone who needs to create beautiful designs without a massive learning curve, Canva is the clear winner. Think of it less like a complex design program and more like a creative playground. Canva is built around a template-first model, giving you thousands of professionally designed layouts for literally everything, from Instagram stories to business presentations.
This screenshot shows Canva's friendly, template-driven interface, which makes it a breeze to get started. You don't have to face the dreaded "blank canvas" intimidation. Instead, you can focus on pure customization—changing colors, swapping photos, and editing text with a simple drag-and-drop system. While it's not the tool for creating a complex logo from scratch, its power is in its speed and simplicity.
Beyond Canva, you can also explore online design platforms like BrandCrowd that offer specialized tools for branding needs like logos and business cards.
Best For Ui Design and Real-Time Collaboration
If your interest lies in designing websites or mobile app interfaces (UI design), then Figma is a fantastic place to start. It's a professional-grade tool used by huge tech companies, but its intuitive design and generous free plan make it surprisingly accessible for beginners.
Better yet, Figma is entirely browser-based. That means nothing to install and your work is always saved securely in the cloud. One of its most talked-about features is real-time collaboration. You and a friend or teammate can jump into the same design file simultaneously and watch each other's cursors move as you work. This makes it perfect for group projects or getting instant feedback. It's a powerful vector editor that feels much simpler to learn than the old-school options.
Best For Learning Professional Industry Standards
If your ultimate goal is to become a professional graphic designer, then learning the Adobe Creative Cloud suite is pretty much non-negotiable. For decades, Adobe Illustrator has been the king of vector graphics (logos, icons), while Adobe Photoshop is the unmatched powerhouse for raster graphics (photo editing, digital painting).
Adobe's dominance is no accident; with a market share of roughly 41.74%, its tools are what most creative jobs require. This is because Adobe products offer an incredible depth of features, are supported by a massive community with endless tutorials, and integrate seamlessly with each other.
The sheer number of buttons and panels in Adobe software can feel overwhelming at first. The key is to start small. Use their built-in tutorials and focus on one task at a time, like editing a photo in Photoshop or drawing a simple icon in Illustrator. This approach builds a solid foundation for a creative career.
Adobe's software runs on a subscription model, which is a financial commitment. However, if you're serious about design as a profession, these are the skills that employers are looking for.
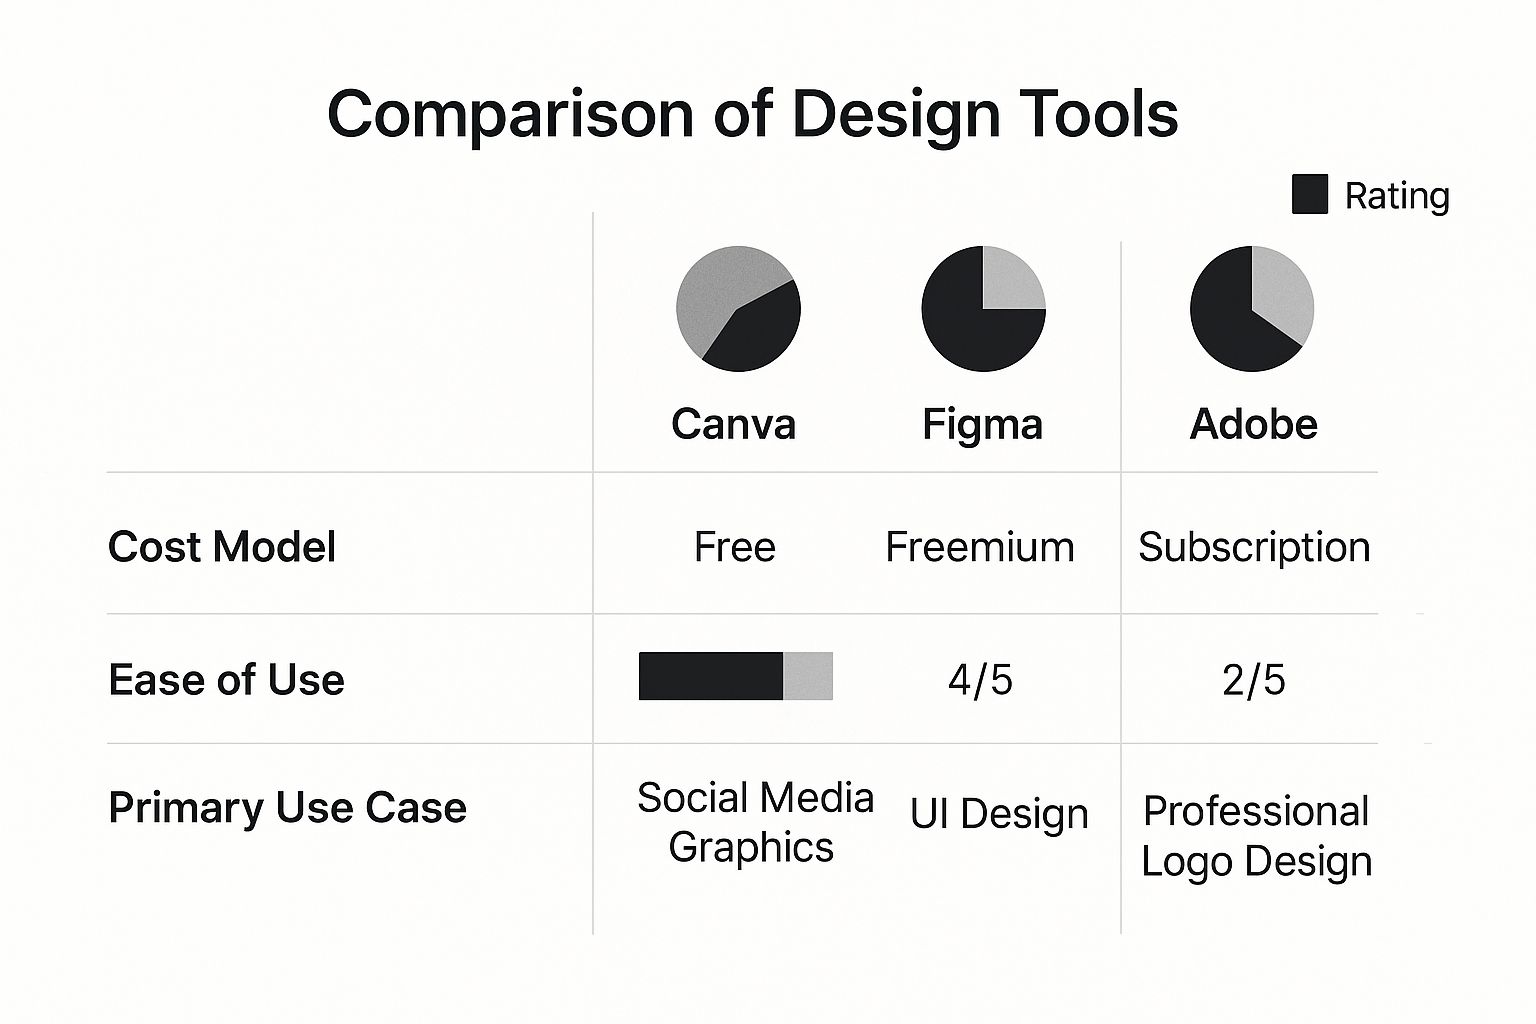
Beginner Graphic Design Software Comparison
To make the choice a little easier, here's a side-by-side look at how these tools stack up for a beginner.
Ultimately, this table shows there's no single "best" tool, just the one that best fits your current needs and future ambitions.
Making Your Final Choice
The best software for you is the one that gets you from idea to finished design with the least amount of friction. Don't overthink it!
Here’s a quick cheat sheet to help you decide:
- Choose Canva if: You want to make beautiful social media posts, posters, or presentations in minutes using templates.
- Choose Figma if: You're curious about UI/UX design, need to collaborate with others, and want a powerful vector tool that’s free to get started with.
- Choose Adobe if: Your ambition is to become a professional designer and you're ready to invest the time and money to learn the industry-standard software.
The best part? You don't have to commit right away. Most of these tools have free versions or trials, so feel free to download or sign up for more than one. Play around, experiment, and see which one just clicks with your creative style.
Time to Create: Your First Social Media Graphic
Theory is one thing, but the fastest way to really learn any graphic design software for beginners is to roll up your sleeves and make something. This quick project will walk you through creating your first social media graphic, a simple workflow you can use in almost any tool, from Canva to Figma.
Jumping right in helps build muscle memory and proves you can create polished visuals right from the start. Let's do this.

Step 1: Set Up Your Canvas
First things first, you need a place to work. Think of this as your digital canvas. For social media, getting the size right is key—it ensures your design looks sharp on everyone’s feed, not pixelated or awkwardly cropped.
Most tools made for beginners have handy pre-sized templates for things like an "Instagram Post" or a "Facebook Banner." If you’re starting from scratch, a simple square is a great, versatile choice for most platforms.
- Your Action: Create a new document. A good, all-purpose size to start with is 1080 x 1080 pixels.
Step 2: Pick a Background
With your canvas ready, it's time to set the stage with a background. You've got two main choices: a solid color or a photo. For your first go, a simple background is often best because it makes sure your text really pops.
A solid color can set the mood instantly—a bright yellow feels fun and energetic, while a deep blue feels more corporate and trustworthy. If you opt for a photo, try to find one that isn't too busy or distracting. You don't want it to fight with your text.
Pro Tip: Your background is the foundation. Keep it simple. You can always add more flair later, but a clean start stops your design from feeling cluttered before you’ve even begun.
If you want to generate some really cool visuals without having to search for stock photos, exploring AI image prompt examples is a fantastic way to create something unique.
Step 3: Add Your Text
Now for the message. Look for the Type Tool (it's almost always an icon with a "T" on it) and click on your canvas to create a text box. The trick here is to create a clear visual hierarchy. Your main point should be the first thing people see.
Here's a simple structure that always works:
- Headline: The main hook. Make it big and choose a font that grabs attention.
- Subheading: A bit more detail, written in a smaller font.
- Call to Action: A little nudge like "Link in Bio" or "Swipe Up."
Remember, people scroll fast. Keep your text short and sweet.
Step 4: Add Some Simple Shapes or Icons
Let's add a little visual interest. Use your software’s Shape Tool to drop in elements like circles, lines, or rectangles. You can use them to frame your text, underline a key point, or just add a bit of decorative energy to the design.
Icons are another easy win. Most design tools have a library full of them. Find one that helps tell your story—like a lightbulb icon for a new tip. A good icon can communicate an idea faster than words can. As you do this more, you'll want to build a consistent look, which is where creating social media brand guidelines becomes incredibly important.
Step 5: Export Your Finished Design
Once you're happy with how it looks, it's time to save your masterpiece. Find the "Export" or "Download" button.
For anything you're posting online, JPEG (JPG) or PNG are your best friends. A PNG is what you'd use for a design with a transparent background, but for most social media graphics with a solid background and photos, a JPEG works perfectly.
And just like that, you've made your first graphic. Congratulations
How to Grow Your Design Skills
Getting the hang of your first graphic design software for beginners is a huge win, but it’s really just the first step. To keep growing, you need a steady diet of practice, inspiration, and a little bit of learning every day. Now, it's time to dive headfirst into the world of design.
Think of it like learning to play the guitar. You’ve learned a few basic chords, which is great! The next step is to listen to the greats, see how they put songs together, and start trying to write your own tunes. The trick is to find things that keep you excited and coming back for more.
Find Your Daily Dose of Inspiration
One of the best ways to train your eye is to surround yourself with fantastic design. But don't just scroll through feeds—really look at what makes a piece of work stand out.
- Behance: This is where the pros show off their work. It’s packed with detailed case studies, so you can see the thinking behind the finished product.
- Dribbble: Perfect for a quick hit of inspiration. It’s full of “shots,” or small snapshots, of stunning logos, illustrations, and app designs.
- Pinterest: Think of it as a visual search engine. You can create your own personal library by saving color palettes, font pairings, and layout ideas to different boards.
Don’t just look—analyze. Ask yourself, "Why did they pick that font?" or "How does that color scheme make me feel?" Taking professional work apart is like reverse-engineering, and it’s one of the fastest ways to sharpen your own instincts.
Build Skills with Structured Learning
Inspiration gives you the spark, but structured learning gives you the tools. Luckily, you don’t need to go back to school to get a great design education. There are tons of amazing resources out there.
If you’re a visual learner, YouTube is an absolute treasure trove. Channels like The Futur dive deep into design theory and the business side of things, while countless others offer quick tips for your specific software. For a more project-based approach, platforms like Skillshare have classes that walk you through creating something from start to finish.
Start Building Your Portfolio Today
This is the most important part: you have to start creating your own work. Your portfolio is your single most powerful tool as a designer, and you don't need to be an "expert" to start building it.
Start with something small and fun. Try redesigning the logo for a local coffee shop you love. Mock up a social media campaign for a brand you made up. Every little project is a new piece for your portfolio, showing your progress and what makes your style unique. This is where the real learning happens—by doing.
Got Questions About Design Software? We've Got Answers.
Jumping into the world of graphic design software can feel like learning a new language. It's totally normal to have a few questions swirling around as you get started. Let's tackle some of the most common ones so you can move forward with confidence.
Do I Really Need a Super Expensive Computer to Start?
Nope, not at all. This is a huge misconception that holds a lot of people back.
When you're just starting out, many of the best tools are cloud-based, like Canva and Figma. This means they run right in your web browser, so they work just fine on most modern laptops and desktops. You don't need a beast of a machine with a fancy graphics card.
Honestly, the computer you have right now is probably perfect for learning the ropes. You only need to think about upgrading way down the line, once you start working on massive, complex projects for professional clients.
The most important thing is simply to start. Don't let your current hardware hold you back from diving in and experimenting with the amazing free and lightweight tools available today.
Should I Learn a Vector or Raster Program First?
This is a fantastic question, and the answer really just depends on what you want to create. It all comes down to your personal goals.
Think about what kind of projects get you excited:
- Go for vector software if you're drawn to designing logos, icons, and illustrations that need to look crisp at any size—from a tiny app icon to a massive billboard.
- Start with a raster program if your passion is in photo editing, digital painting, or creating image-heavy designs for social media and websites.
For what it's worth, many beginners find raster-based tools with built-in templates, like Canva, to be the most rewarding entry point. You can get a great-looking result really fast.
Can I Actually Get a Design Job Using Only Free Software?
Yes, 100%. What clients and hiring managers really care about is the quality of your work and the strength of your portfolio—not how much you paid for your tools.
Seriously powerful free programs like Figma, Inkscape, and GIMP are more than capable of producing professional-level results. Building an impressive portfolio with these tools shows you have design chops, but it also proves you're resourceful and adaptable. Those are skills every employer loves.
At the end of the day, your creativity is the asset, not the software.
Ready to create a brand identity that truly stands out, without the steep learning curve? The expert designers at Softriver craft custom logos and complete brand packages with unmatched speed and quality. Get started today and see how professional branding can elevate your business.